Thursday, July 30, 2015

Pasta alla Genovese (onion & beef pasta sauce) - Video Recipe

My Pasta alla Genovese is an exquisite masterpiece of a meal that Italian renaissance painter, Caravaggio, could have featured in his shadowy, luscious paintings.

Well, this Culinary Artist has made a video which is suitably framed in your computer monitor.

The ingredients are humble, just beef, onion, carrot, celery and a little white wine. And the recipe is easy to do.

This rich pasta dish takes a lot of time cooking, kind of like a pot of beans. But, it's worth it. Just put it on after lunch and 3 or 4 hours later, it's ready. It only needs a stir every once in a while.


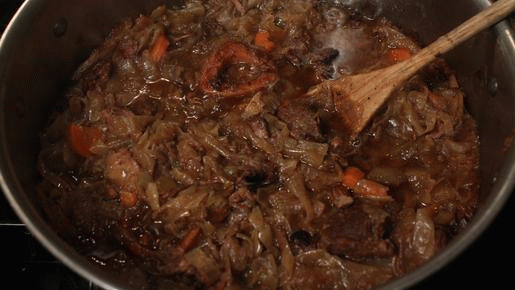
And you may shed a few tears chopping a dozen onions because it takes about 4 pounds worth. I sliced 8 cheap yellow onions for my recipe. It doesn't take too long to do it since the onions are only roughly sliced. They will soften, shrink, and cook down to a thick pasta sauce.

Onions are the cheapest veggie. Usually priced way below 99 cents per pound, and yellow onions are often on sale for 3 to 7 pounds per dollar. You can use any type of onion you like.

Click on any photo to see larger.

Traditionally the protein part of Pasta alla Genovese is made with beef, veal, pork, or a combination of these meats. Pork is a cheap way to go, but for this version I went over budget, but not by too much. And, enough pasta sauce is made for 4-6 servings (or more,) so it still cheap, at around a buck per serving (depending on the price of beef at your neighborhood grocery.)


I used the cheapest cut of beef I could find -  beef shank on sale at my local Latin market for around two dollars per pound. Beef shank is a tough cut of meat, that's why it's a bargain. But if you cook it for a couple of hours it gets fall-apart tender. And if you want to keep it cheaper, then try combining pork and beef.


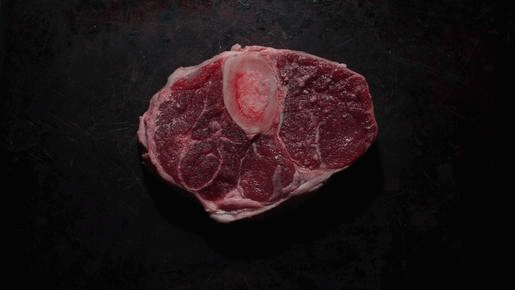
For beef at $1.87 per pound, you have to by the whole shank. This cut of beef freezes well for stews, or a hearty beef chili.


For this cheap$kate recipe it takes 2 slices of these bad boys. I splurged and purchased a package at $2.29 per pound, for $3.16. I got about 5 servings with pasta - that's still an excellent deal.


I like beef shank because there is a wide bone in the center that's filled with buttery marrow. Make sure to scoop it out to eat when done - that's the cook's reward.


You could even do a version with cheap chicken leg quarters or cheap cuts of pork like the shoulder. Nobody will complain, it's really all about the sweet flavor of slow cooked onion. If you have tried French Onion Soup then you know what I mean (my own cheapie French Onion Soup version is a click away, here.)


Overall it's simple to do, nothing fancy, and with very few ingredients to deal with. You can easily feed the whole family with my cheap$kate entree. It even tastes better the next day, and it also freezes well, to pack for work lunches. (For reheating I would use a divided container, so you can take out the pasta before it overcooks - the meat and onion sauce takes longer to heat up.)


So check out my recipe video below for Pasta alla Genovese. Your guests, or family, will be impressed with this luscious, Italian edible masterpiece.

Pasta alla Genovese - VIDEO

Play it here, video runs 3 minutes, 16 seconds.

My YouTube video link for viewing or embedding, just click here.

Ingredients (4-6 servings)
  • 1 to 2 pounds beef - I used a package with 2 beef shanks (about a pound and a half.) Beef chuck blade steak is cheap too. Some recipes call for a mix of pork and beef - that right there make this recipe even cheaper. You could even go for the cheapest way by using chicken leg and thighs. Beef shanks can have large bones, so you may need more, just try to have a pound or two of beef in the end.
  • 4 pounds of onions - or about 6 whole onions, depending on size, roughly sliced. Red, white or yellow onion. I used cheap yellow onions. You can't have too much onion!
  • 1 whole carrot - chopped. Okay to use shredded carrot from the package (about a cup.) For baby carrots, just roughly chop the equivelent of a whole carrot.
  • 1 stalk of celery - chopped.
  • 3/4 cup white wine - optional, okay to use red wine. If you leave out wine then add water, or a favorite broth, instead.
  • 1 bay leaf - optional.
  • Tablespoon of oil - for sauteing beef and veggies.
  • Salt and pepper to taste.
  • Pasta -  Cooked any way you like or to package directions. I like a penne or large tube pasta, although you can use any favorite you have on hand. Make pasta just before serving meat and onion pasta sauce.
  • Parmesan - optional. Sprinkle on dried or fresh parmesan when serving.


Directions
I used 2 beef shanks (about a pound and a half.) Slice beef into large cubes. It will eventually shrink and break apart. Trim any excess fat, although I like me some fat, so don't discard it all, that's extra flavor.


In your largest pot add a tablespoon of oil over a medium heat. Add the cubed beef and saute for about 5 to 8 minutes to brown, at least, one side. This will give the sauce a rich, dark hue. Stir beef when brown.


While beef cooks, slice carrot (discarding ends) and celery. You can use celery leaves, too.


Next add the chopped carrot and celery to browned beef. Season with salt and pepper. Saute for a couple of minutes.

Click on any photo to see larger.

Pour in white wine, water or a favorite broth. Mix beef and veggies well, scrapping the pot bottom to free up the tasty beef brown bits. Add a bay leaf, optional.


Slice off onion ends, divide the onion, and  peel off the papery skin.Rough slice the onion halves. Don't worry about how thin; the onions will shrink and cook down after 2 hours.


Now time to bring it all together. Fill up the pot with sliced onions and cover the pot. Keep the heat at a medium/low heat as onions cook down.


*If your pot cannot hold all the chopped onion, let the onions sweat and cook down for about half an hour. This will give you room to add the rest of the chopped onions.


Now you can mix all the pot ingredients. Cover the pot and just keep simmering the meat and onion on low, for about 2-3 hours, until all the onion is reduced. Time will vary, depending how much onion you use. Stir ingredients every half hour or so.


You will notice how much liquid the onions give off, about 2 cups worth.

(This Italian sauce can be cooked for hours, covered and at a low simmer - anywhere from 3 to 6 hours. Just check to make sure the liquid doesn't cook away. Add half a cup of favorite broth, or water, as needed.)


Finally, uncover and continue cooking until the sauce is reduced by half, about another 30 minutes (if needed.) Stir occasionally. You want to end up with a sauce that's mainly caramelized onion and meat. It's up to you how thick or thin you like the pasta sauce. Add more broth or water if the liquid cooks down too much.

When the sauce is done you can make your favorite pasta. Just keep the sauce warm until the pasta is ready. Serve with dried or fresh parmesan. Heck, this Pasta alla Genovese is good enough without parmesan cheese.


Hindsight
Some recipes call for adding 1/2 cup of milk and a tablespoon of tomato paste. I like these additions, too.

You want to cook the onions until they are caramelized and starting to break down, at least 3 to 4 hours. It's like cooking dried beans, you can keep the sauce covered and low simmering most of the day if you like (and have the patience.) Just check to make sure sauce doesn't dry out - add a little water or broth as needed.

You can add more or less meat. It's up to you and your budget.

Freeze the leftovers - it microwaves fine.

Friday, July 24, 2015

Deal of the Day - Classic Hummus

I like Deals of the Day that say what they mean, like Mediterranean Kitchen's Classic Hummus. That's it, just chick peas, tahini and a little water and oil, with a minimal amount of preservative.

It doesn't take much to make a cheap and delicious Middle Eastern snack dip. This vegetarian Hummus has been stocked in my local 99c only Store and Dollar Tree lately. Just go the the refrigerated glass case to find it. Usually my wife prefers the hummus at Trader Joe's, but this is a tasty change of pace. But for half the price I can recommend this Hummius.

(And click on the following recipe names to see a couple of my cheap$kate homemade Hummus recipes: a Plain Hummus and Eggplant Hummus.)


At only 7.5 ounces, it's easy to finish off half a container. I usually like to slice pita into small triangles to dip with, but if I have crunch veggies around, like carrot, then I'll mix it up. I can easily finish up what's left in a box of crackers with Hummus.


The Hummus texture is creamy. And the taste is bean and buttery with a touch of sourness. It's a decent version of a classic Hummus.


There's an expiration date for this Hummus, but that's no problem as the dip never last more than a couple of days, once it's opened..


If you are particular about your Hummus, this may underwhelm, but for the price and overall flavor, it think it's a good Deal of the Day worth a strong 7, based on my rating scale of 1 to 9, 9 being best.

I can recommend Mediterranean Kitchen's Classic Hummus to set out for yourself, or any guests.

Saturday, July 18, 2015

Wife Approved Recipes - Picnic Sandwiches

 It's a 2fer blog post today: sandwich recipes plus a concert video of troubadour Aimee Mann.

My Wife Approved Recipes have been road tested, so you know they will satisfy. And these tasty sandwich treats are perfect for your summer picnics.

My wife and her mother sometimes take tea at a local parlor, and I heard her talk about what they had to eat. Well, the sandwiches served sounded good and actually cheap to make, especially the cucumber ones.

Check it all out below - how to dine in style with an outdoor concert picnic.

Nothing goes better with a free concert by a folk-rocker in the park than delicious picnic sandwiches by The 99 Cent Chef.  My wife didn't have to drag me to Marina del Rey's picturesque Burton W. Chace Park to see songstress Aimee Mann -- especially when all we had to pay for was parking and a few picnic ingredients.

We hit the freeway for a show that spanned a beautiful summer evening from sunset to full moon. At an outdoor stage in the marina's waterside park, we found a hilly spot right there, and laid out my sandwiches on a blanket, then opened our first bottle of wine. The crowd was a local mix of families and hipsters. Aimee started right on time (7pm). She played a great show, with a sliding, tuneful, lead vocal, while strumming amplified acoustic guitar, accompanied by her band. The show inspired me to film and edit a recipe video underscored by her live performance.


For our picnic, I easily assembled the sandwiches from ingredients from my local 99c only Store and Latin market. For my first sandwich recipe I made a Salami and Dijon on Sourdough. The 99c Store has recently been stocking higher-end 3.5 oz. packages of Hormel Genoa and Hot Sopressata Salami. I especially like the Sopressata -- it's lean ground with white flecks of marbling. I also picked up a great Country Dijon by Morehouse. This condiment is rough ground whole mustard seeds -- popping with tangy flavor. I served it all on sourdough bread, but you could use any bread or roll you have on hand.


I would guess that Aimee Mann is more vegan than carnivore. So for my next sammy it's a Cucumber and Cream Cheese Sandwich. I found dark Russian bread, which has a nutty flavor, but you could also use pumpernickel for a traditional tasty tea-time finger food. I like to peel off about half the cucumber skin so the bitterness is reduced. This is a creamy and crunchy refreshing bite between two slices of bread. To go totally vegan, you could substitute hummus for cream cheese (my basic hummus recipe is here.)


And finally, my most controversial picnic basket addition: a French Ham Sandwich. You can be sure Mr. Ludobite (the 5 star Beard awarded French celebrity chef Ludo Lefebvre) would flip his beret and scream profanities if he saw what I use for ingredients in his homeland's namesake sandwich (click here to see Chef Ludo throwing a hissy fit.)

 A typical French Sandwich is simply made with butter, ham, cheese, and crusty French bread.  I would normally make it that way too, but since this is a blog for cheapskates, I used imitation butter and slices of Farmer John's "Ham Roll !" Now, was it as good as a Parisian sidewalk cafe classic? Of course not, but no one in our party complained. You can make it with expensive ingredients to impress your  foodie friends, if you have the dough.

So for your next summer outdoor concert, feel free to make any, or all, of my Picnic Sandwiches. And if you like this musical recipe video, be sure to also check out my video of conductor Gustavo Dudamel leading the L.A. Philharmonic at the Hollywood Bowl. His "Rhapsody in Blue" becomes the soundtrack while his namesake hot dog is assembled at Pink's, L.A.'s most popular fast food joint. To view it, just click here.

Picnic Sandwiches with Aimee Mann - Video
 
Play it here. The video runs about 7 minutes.

To view or embed from YouTube, click here.
Aimee Mann's website: http://www.aimeemann.com/

Directions for Salami and Dijon on Sourdough Sandwich
On 2 slices of bread, spread Dijon mustard. Layer on slices of your favorite salami. I used thin-sliced, so about 6-8 slices per sandwich. Slice into quarters and fasten with a toothpick.


Directions for Cucumber and Cream Cheese on Russian Bread (or Pumpernickel)
Smear cream cheese thickly on Russian or pumpernickel bread. I like to peel off half the skin from my cucumbers. I also slice them pretty thin (see photos.) I used about 4-6 cumber slices per sandwich. Layer on the slices. Cut sandwich into four rectangles and hold together with toothpicks.


Directions for a French Sandwich
I spread a thick layer of margarine on a couple of slices of French Bread -- you can substitute with real butter (room temperature.) I often pick up real ham slices at my local dollar store, but this time I used 2 slices of a Ham Roll by Farmer John (surprisingly, quite good.) Again, slice sandwiches into quarters and fasten with toothpicks. I left out cheese, but a good addition would be a slice of Swiss cheese.


If you are making your sandwiches ahead of time, make sure to store in the refrigerator. They will come to room temperature by the time you reach your destination.

99 thanks to Aimee Mann and her groovy band -- they made our  picnic a summer highlight.

Sunday, July 12, 2015

Man Cave Cuisine - Spicy Tuna Handroll

Sushi is Man Cave Cuisine? You bet when it's an easy-to-make Hand Roll. That's what it's all about when you hang out in my Man Cave - simply delicious food. 

You don't have to be an expert sushi chef to make my version of a Spicy Tuna Hand Roll. Just get out a sheet of dried seaweed and roll up some fishy filling and rice, with a few slivers of your favorite veggies. If you can make a burrito then you can do this recipe.

Go fishing and bring home the protein - or if you're a city boy then get some fish from you local fish monger. And for a cheap$kate version using fake crab (called krab) go to Hindsight at the end of this post to get the lowdown.

So read on guys (and gals,) I got it all laid out for you below. Man Cave Cuisine isn't all meat and potatoes.

The easiest sushi to make is a Hand Roll. And for my next Sushi Recipe Video I'll have you literally eating out of my hands.

When you dine at the sushi counter in a Japanese restaurant it can be intimidating -- all that precise assembling and slicing choreography.

Making a Hand Roll is like making a flatbread (or tortilla) sandwich roll. Just slice up some veggie and fish ingredients and pile it on a sheet of seaweed (known as Nori) half covered with cooked sushi rice -- then roll it into the shape of a pointy-end snow cone.

Japanese chefs work overtime on visual presentation, but a Hand Roll is more about what you put in, than how it looks.

For this Hand Roll I'm using Spicy Tuna. And Spicy Tuna is just mayo and hot sauce (usually Sriracha Spicy Chili Sauce, or an imitation brand) mixed into chopped raw tuna. But any hot sauce can be used.

(For a cheaper hand roll scroll go to the end of my blog post under Hindsight, and read about making one with imitation crab - I'll have a fake crab recipe, with photos and text, posted in a few weeks, too.)

If you made my Nigiri Tuna Sushi from the last blog post then you may have saved some tuna scraps. A hand roll is perfect for the small trims of tuna, any uneven pieces, and unattractive cuts. (When I make sushi I never throw away the fish scraps, unless it's just too stringy or chewy.)

The only tricky thing is spreading out sticky rice and rolling the Hand Roll. And even that isn't too difficult.


For handling sticky rice just dampen your hands. And for rolling, roll the loaded seaweed diagonally, and seal it with dampened fingertips -- the ingredients will hold together in a sleek black wrap.

With a hand roll the rice doesn't have to be perfect sticky sushi rice. You can use any favorite rice recipe. The sheet of dried seaweed will hold it all together.


You will need a good cut of raw fish (I get mine free from my fisherman neighbor Don, click here to see video.) For this recipe I used fatty tuna. I used a leaner cut of tuna for my Nigiri Tuna Sushi video recipe from a last week. And Click here for  a list of fish commonly used for sushi.


Probably the most unusual ingredient for a Sushi Roll is dried seaweed. They come in 8 inch square thin sheets; anywhere from 10 to 30 sheets to a package. I get mine at Oriental markets, but they are now being sold in some regular chain grocery stores. If you have a Little Tokyo or Chinatown nearby, then you can find dried seaweed, for a decent price. The best price I've found is 30 sheets for $2.49 -- that's less than 10 cents per sheet! Even if you have to pay twice as much, you will surely use up the whole package trying out everything in my Sushi Recipes Video Series.


I was intimidated to try making sushi for a long time, but now I do it frequently. The main thing is to do it a few times -- with a couple of mistakes under your belt, you will get better. I have.

So do check back for more sushi recipes, including a cheap, easy-to-make, California Roll, that's made with krab, cucumber and creamy avocado.

  Spicy Tuna Hand Roll- VIDEO 
Play it here, video runs 2 minutes, 30 seconds.

My YouTube video link for viewing or embedding, just click here.

Ingredients for Spicy Tuna (2 to 4 rolls)
  • About 6 ounces of tuna - skinless and no bones. I used fatty tuna for this recipe.
  • 3 tablespoons mayo - I used light mayo. Add more or less to desired creaminess.
  • 1 teaspoon Sirracha Chilli Sauce - can also use a favorite hot sauce, grated horseradish, or a pinch of ceyanne pepper. Okay to add a little at a time to reach desired spicyness.

Other Ingredients
  • About 2 cups cooked Sushi Rice - for my Sushi Rice recipe, click here for text with photos, or scroll down to the end for video only.) You can use any type of cooked rice for a hand roll.
  • 1-2 sheets of dried seaweed - sliced in half
  • Favorite thinly sliced veggies - carrot, green onions, cucumber or avocado. For a hand roll, fill it up with any favorite sliced veggies, raw or lightly steamed.

Directions for Spicy Tuna Hand Roll
Have Sushi Rice at the ready, room temperature. To see my Sushi Rice recipe, click here.


Mix mayo and Sirracha Chilli Sauce (or your favorite hot sauce) in a bowl. Add a little hot sauce at at time and taste, to bring up to desired spicyness.


Roughly chop raw tuna into small pieces. Mix chopped tuna with spicy mayo. Cover and store in refrigerator until ready to use.


Thinly slice favorite veggies such as: carrot, green onion, cucumber and avocado. Slices can be long or short. You can use packaged shredded carrot or peel and slice your own.


For whole carrots just peel off skin and chop off ends. Split carrot in half across the middle, then split one more time lengthways. Finally slice carrot segments thinly.


For cucumbers slice in half lengthwise and spoon-out seeds. You can peel some of the cucumber or not.


For green onion slice off the green stems and give the stems one more slice lengthwise. (While the green stems are tasty they are tough to bite through, so slicing them thinly makes it easier.) You can sprinkle in some of the chopped white onion pieces too. (Discard green onion root and any wilted stems parts.)

Next, slice dried seaweed in half. It's kind of brittle so handle carefully. Please note that dried seaweed is super-obsorbant, so make sure cutting surface, your hands, and the knife are dry.


Time to bring it all together. Place halved seaweed section, lengthwise, on a dry surface. Dampen fingers and spread on a layer of Sushi Rice over about one half of the seaweed. Just enough rice to cover the surface, no need to pile it on too thick.


Now add spicy tuna on the rice-side of the seaweed. It's up to you how much fish to add - a thick or thin layer. Again, once you've made a few Hand Rolls then you will get better at figuring out the amount of rice to fish you like.

 Okay lets wrap it up! Lay on your veggie slices diagonally over the spicy tuna and rice. Next, roll the seaweed in a diagonal direction: bottom left side to upper right side. (I'm right handed, but if you're left handed then make the hand roll filling on the right side of the seaweed, and roll it bottom right to top left.)


Finally seal the Hand Roll with a bead of water. When you have rolled it up moisten fingertips and wipe the seaweed end-edge and press it together. It should seal up and stick together easily.

The end result will look like an ice cream cone with the pointy end. You can make Hand Rolls one at a time or all at once.

Hindsight
If you don't like raw carrot, it's okay to seam for a few minutes to desired softness. This pertains to any veggie you like to use.

It's up to you how much veggies, rice and fish you add to each roll. You can be generous or skimpy doling out the spicy fish.

I know sushi grade raw fish is way expensive. A cheap seafood substitution is krab. You've seen the small frozen packages in seafood deli cases, and even laid out with fresh fish. It's tasty and you don't have to pry it out of a shell. Sometime the quality is suspect. It can be a little dried out from freezing for too long. An easy way to reconstitute, after defrosting, is to sprinkle on a little water, loosely cover, and do a 30 second micorwave (take out pieces as they get warm and soft, and continue to zap in 10 second increments, if krab pieces are still cool.) The krab will soften and plump up perfectly. Finally do a rough chop and mix it with the some Spicy Mayo.

Hand Rolls work well with imperfect rice, too. Since the rice is in a wrap, you can use reheated cooked rice from another day, or even defrosted from the freezer. Just make sure the rice is heated to room temperature.

You can easily use brown rice, just follow my Sushi Rice directions. And after the rice is cooked, let it set for an extra 10 minutes. Brown rice is toothsome with an extra nutty flavor, and more nutritious.

Sushi Rice Recipe Video
Related Posts Plugin for WordPress, Blogger...