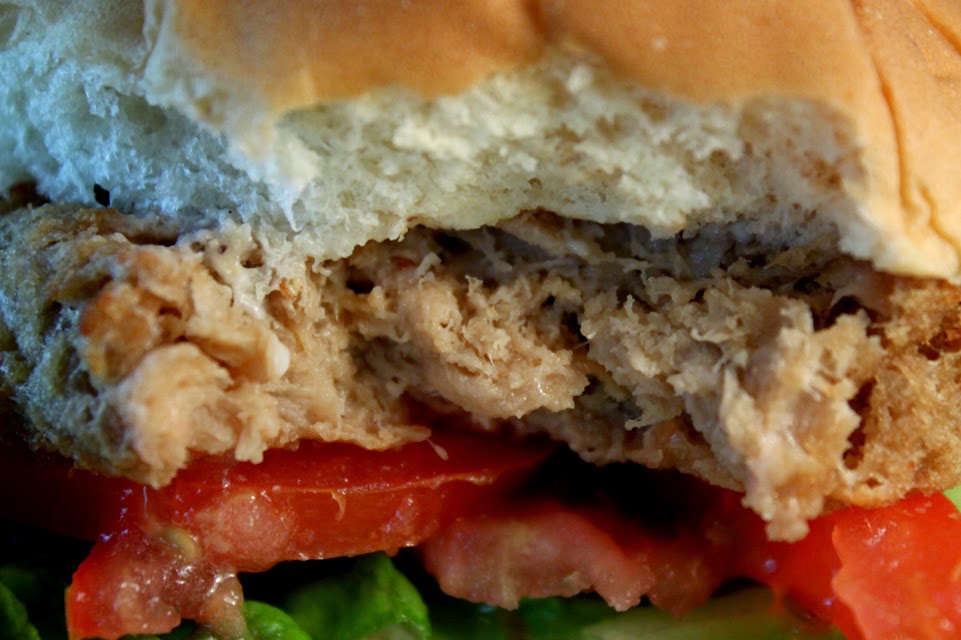
It's a tasty soy burger that comes cooked and frozen. All you do is zap it for a minute and a half and it's ready to eat. I'm wary of frozen factory-made veggie patties, but Lightlife Meat Free Backyard Grill'n Burgers were surprisingly savory.
I got mine at the 99c only Store and the package holds 4 patties - a great deal. As I've pointed out before, this type of Deal of the Day is often only stocked for a day or two before they sell out. So I can't guarantee if you can find them. But if you see them grab a few bags. Even for a regular price at a typical grocery, it would be worth it. A delish soy or veggie burger is hard to find.
Resting on a typical cheap burger bun, the soy patty was the right size and thickness. I dress my burger with mayo, mustard, lettuce and tomato. The soy patty microwaves fast, as it's already cooked. I covered the patty with wax paper to make sure it didn't dry out, if it defrosted early.
frozen defrosted
I liked how moist the soy-veggie patty was. The main ingredients are listed as: water, soy protein, canola oil, wheat starch and eggs whites. Do eggs whites disqualify this burger as vegetarian?
As for the taste it was beef-light in flavor with a slight mushroom undertaste. The texture was slightly chewy, in a good way - similar to a well done beef patty, but still moist. It is under-seasoned, so you may want to add a little salt and pepper, or seasoned salt. The color is boring brown, but that's okay. (And topped with melting cheese would definitely bring the soy burger over the top.)
Overall I was quite impressed with Lightlife's soy patty. It reheats fast and is quite tasty. So on a Cheap$kate Dining Scale of 1 to 9, 9 being best, I give Lightlife Meat Free Backyard Gill'n Burgers an 8 ! It is a good all-around soy patty, with enough flavor to satisfy a meat eater. It's an excellent Deal of the Day.
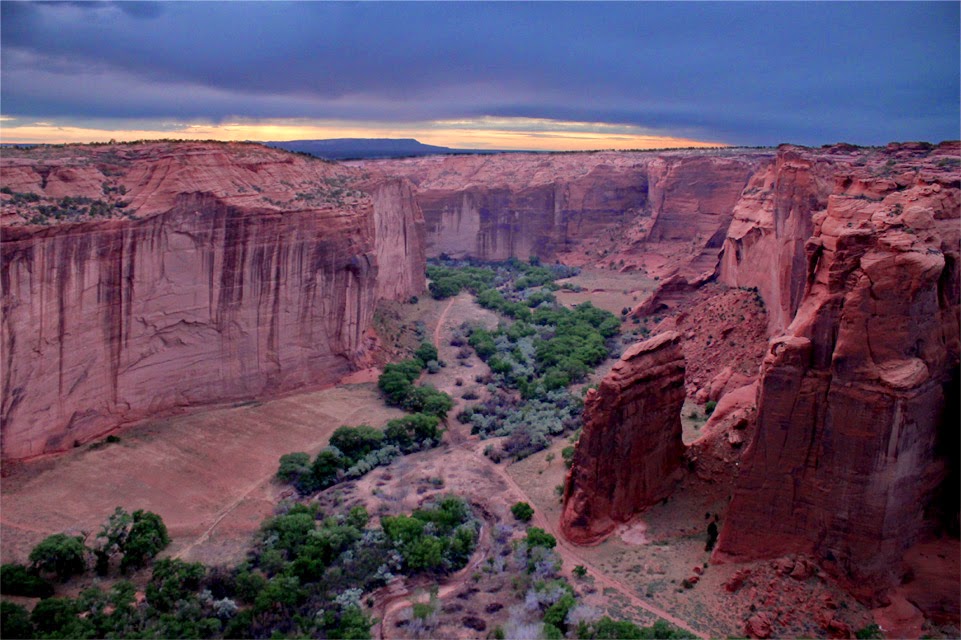
This is the last video of myIndian Summer Vacation Series, and while only running three minutes, it's a spectacular one. Our last day was spent in Canyon de Chelly (info here,) near Chinle, Arizona. While part of the Navajo Nation, it's partially run by the National Park Service. And some Indian families still live there. You are required to have a guide to enter the canyon (except for the White House Ruin Trail.)
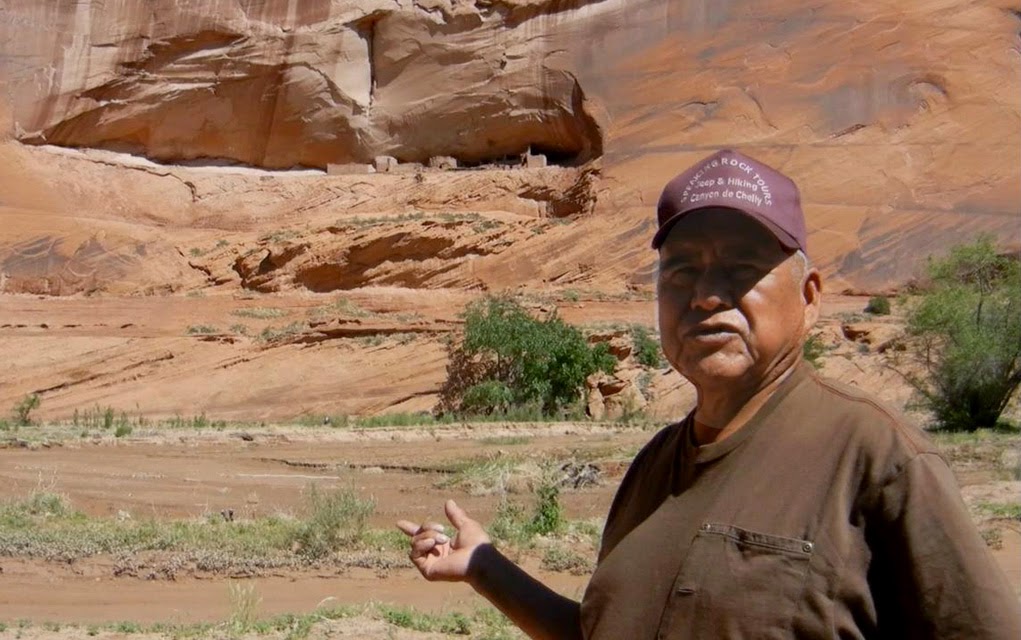
Our home base of Spider Rock Campground (see my video blog post, with links, here) supplied a tour guide at $75 dollars per person. While quiet-spoken, our tour guide, Ben, shared many interesting stories about Canyon De Chelly. You check in at a ranger station then just drive right in. We brought a picnic, as the tour lasted half the day.
It's a fertile valley with 2000 foot (in parts) high walls on 2 sides. Many plants and animals trive here - while just outside of Canyon De Chelly the landscape is harsh and desert-like. Various Indian Clans have settled here over time. The valley floods during a short rainy season, but while we were there our tour guide only had to drive through shallow stream beds.
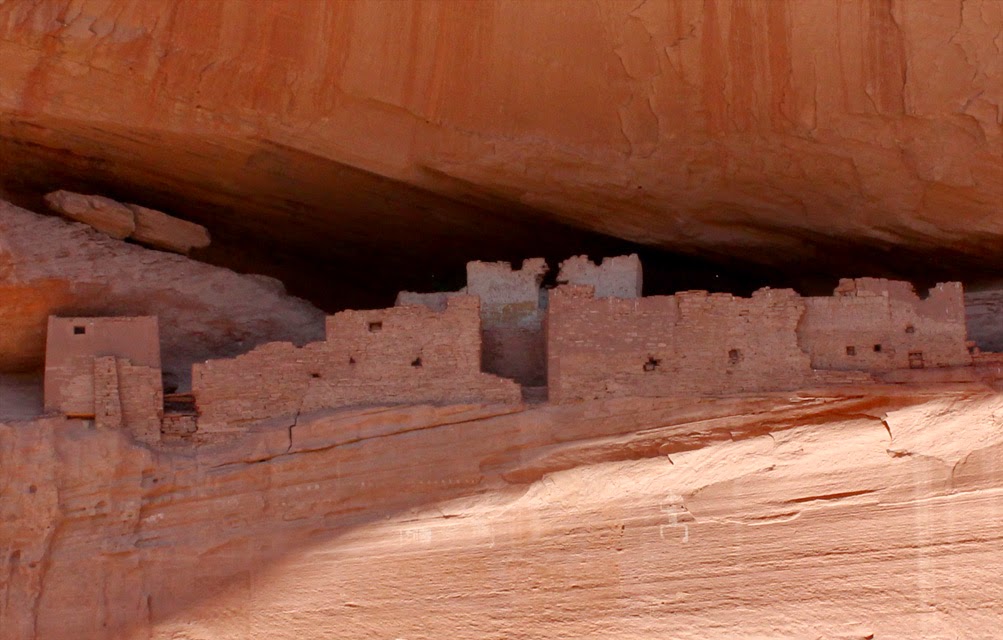
We made many stops to look at petroglyphs and ancient Indian dwellings. Make sure to bring binoculars as the cliff dwellings are almost impossible to reach. Even the original inhabitants had to build long ladders to climb to the stone pueblos.
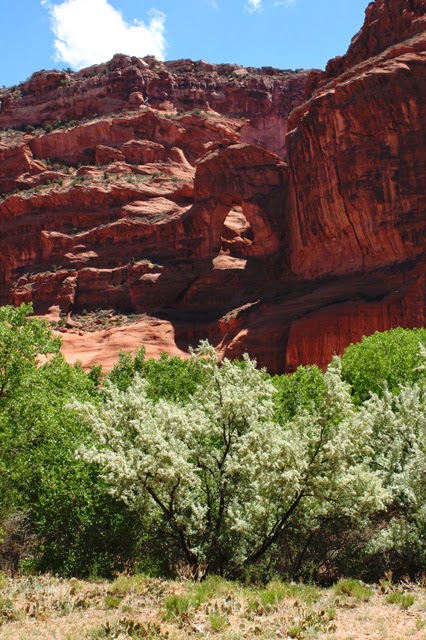
The ocre/red sandstone walls drop straight down with natural caves and ledges in the shear walls. Ancient peoples carved-out and built structures in the cliffs thousands of years ago.
The White House Ruins is one of the main stops. There are water stations and restrooms nearby. Gift tables manned by local natives carry all manner of jewelry, pottery and clothing. You can walk a trail to get closer, although we did not do it. Waves of different Indian Clans have taken refuge there. I asked out tour guide why anyone would live in the side of a cliff, he said it was because of the floods and wild animals (and probably to keep enemies at bay.) Another blogger describes a hike to the ruins here.
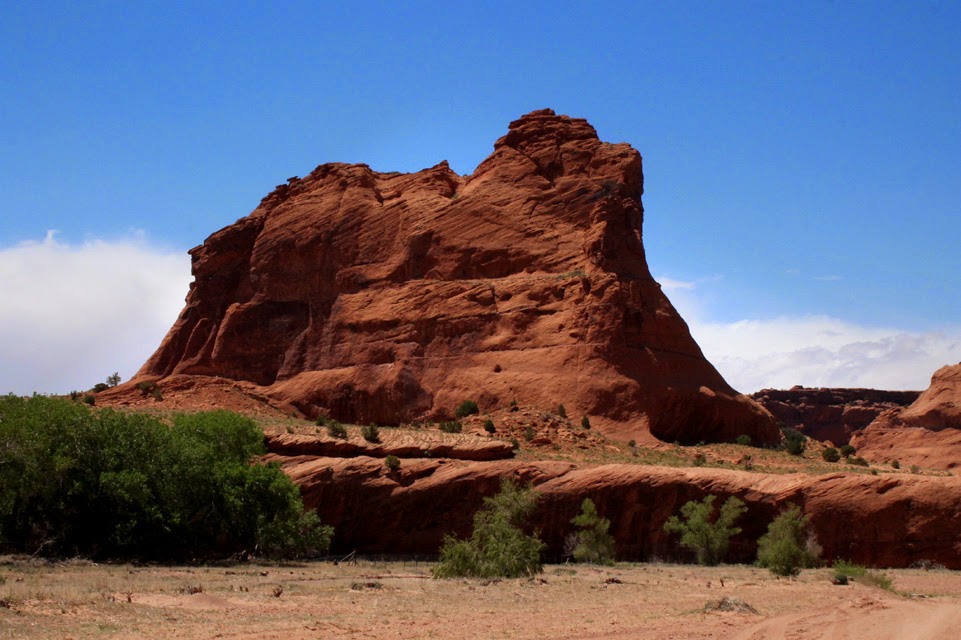
Driving along the majestic high walls puts you in humble space. We even passed a sandstone Arch or two. At the end of the trail was Spider Rock. At about 800 feet high, it looks nothing like an arthropod. The spectacular red sandstone monolith is said to be the home of Spider Woman, an ancient Navajo Deity, click here to read about the legend.
Spider Rock is indeed awesome and we stopped to have a picnic under the trees nearby. This was the end of the valley tour for us. We packed the leftovers and headed back.
One last photo op was for Dog Rock, can you see the canine? Well, just watch my video below, were I trace the outline (if you can't quite make out the dog.)
Dog Rock
That's it. My Indian Vacation Series is over, but you can return anytime to view all 9 blog post and videos anytime. A big 99 thanks to my wife, Amy, for arranging and booking the trip (and for being a fun travel mate,) plus all the cool tour guides, park rangers, and friendly and informative local Native Indians, for showing us the way.
Canyon de Chelly- Video #9
Play it here, video runs 3 minutes.
My YouTube video link for viewing or embedding, just click here.
Indian Summer Vacation Series (click on any title below to see the blog post).
Leave it to American Indians to come up with a delicious dish that looks like a Mexican pizza: a Frybread Taco.
I had a Frybread Taco during a lunch stop on the way to Arches National Park. It's similar to a humongous Americanized taco, but on a fluffy, airy round of pizza-like crust - really quite tasty.
All the typical ingredients seemed simple enough to assemble, just ground beef, beans, iceberg lettuce, tomato, onion, grated cheese and sliced black olives, on a slab of Indian Frybread. For my version I left out the beef, olives and onions, but you can mix and match almost any favorite taco ingredients you like. Do you want meat on your taco? I have an easy and quick recipe for that right here.
Flour, baking powder, water and oil, that make up Frybread, are cheap enough. I made this entree vegetarian and all the toppings fall within my 99 cent mandate. As I mentioned above, you can make it with ground meat, while that is an inexpensive protein, it's still over my budget.
If you have been following my Indian Summer Vacation Series then you've seen my Frybread VideoRecipe from a few weeks ago. Check it out below to see how locals do it.
Frybread is light and tasty, kind of a cross between a flour torilla and pizza crust. They are on the large size, about 8 inches across, so one Frybread Taco is almost enough for a meal. My recipe makes enough for 2 Frybread.
The main topping ingredient for this taco are Chili Beans. I take a shortcut and use canned. Also, you can also use any favorite canned beans, like pinto, chili with beans, red or black beans. If all you have are red beans or pinto beans, try adding half a teaspoon of chili powder. And you can use nutritious spinach instead of iceberg lettuce.
Frybread right out of the frying pan is delectable and you should try it once, even if it is made with white flour and deep fried like a doughnut. (You can substitute whole wheat flour instead of white.) It's a delicious indulgence.
So give my Frybread Taco a try, it's a unique taco and looks good on the plate.
Ingredients for Frybread (for two, eight inch round tacos)
1 1/4 cup of flour - okay to use wheat flour.
1 teaspoon baking powder - it makes the Frybread blister and puff up.
1/2 cup of water
Vegetable oil for frying - any favorite. Most recipes call for lard or Crisco, you can use it, if you want to.
Frybread Taco Toppings
Chili beans, chopped tomato, lettuce (or any greens) and shredded cheese. Other topping include: sliced black olives, onion, avocado, taco-style ground meat (recipe here,) pico de gallo (recipe here,) and of course, hot sauce.
Directions
Add flour and baking powder to a large bowl. Mix well.
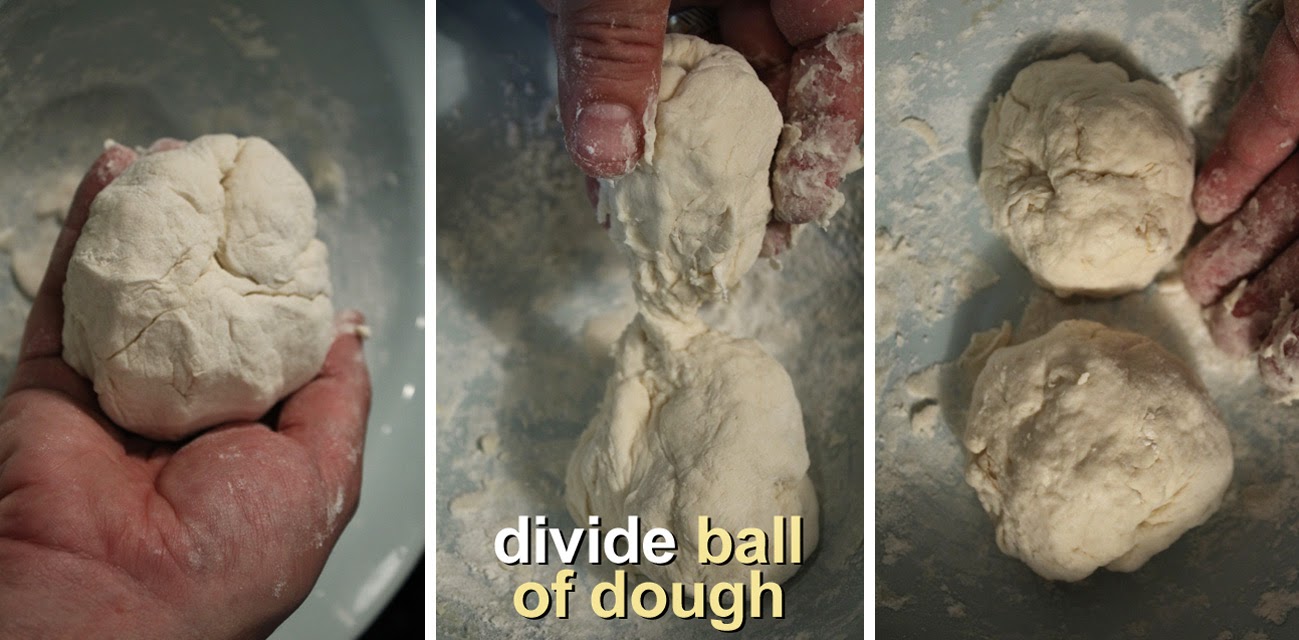
Pour in water and begin to stir with a spoon or fork. As dough comes together you will need to get your hands in there to form a dough ball.
If the dough is sticky when all mixed together, then sprinkle on a teaspoon of flour and fold the dough some more. You shouldn't need more flour than a couple of teaspoons.You only need to mix and fold the dough for a couple of minutes, total.
When dough if well mixed together, pinch it in half and form 2 dough balls.
At this point you can chop any veggie toppings and set them aside. I used tomato, red leaf lettuce and cheddar cheese.
Start the Chili Beans heating in a pot (or zap them in a microwave oven.) I like to get all the topping ingredients ready to assemble when the Frybread comes hot out of the oil.
Add oil into a frying pan that's at least 8 inches across. Add enough oil until half an inch deep. You want enough for the Frybread dough to float when cooking. Start with a medium/high heat for frying.
While oil is heating make the Frybread rounds. Sprinkle a little flour on a board or counter. Spread it out about 8 inches around. Lay out one dough ball and flatten with your hand and fingers. Start from the center and work your way outward.
Keep pressing until you get a tortilla shape. It doesn't have to be perfectly round, the main thing is to make it thin without tearing (or taco fillings will fall through.) It should be similar to thin crust pizza.
Repeat the shaping steps on the other dough ball. Now time to fry it up.
Pinch off a small piece of dough and drop it into the now hot oil. The dough should immediately bubble and float. Be careful as you are working with hot oil. If you have a frying thermometer the temperature is about 375 °F (190 °C.) I just guess, with my heat controls in the medium/high range.
Spoon-out the dough piece. Use both hands to pick up the flatten dough and slowly add it to the hot oil. Again, be careful when working with hot oil. The dough will bubble and quickly float.
The dough cooks quickly, no more than 30 seconds to a minute. Use a metal spatula or fork, and lift one edge of the dough to check that the Frybread is stiff - that means it's read to be turned over.
Turn the Frybread over and cook another 30 seconds or so. That's it. The Frybread doesn't have to be browned like a doughnut - you may get a few light brown spots.
Now just lay the Frybread on a paper napkin, or a wire rack, to drain off the oil. Repeat the same frying method for the other dough ball.
It's best to assemble and eat the Frybread Taco while it's still warm. You can add the toppings in any order. I like the beans on the bottom then add the rest of the toppings. If you want melted cheese then add that on the hot beans, followed by the other ingredients.
The balance of ingredients is up to you. Add a lot of beans or just a little. Double up on the cheese or veggies. It's all to your taste.
Now just eat the Frybread Taco like you would a big slice of pizza. It's easier to handle than pizza, as Frybread is stiffer - somewhere between a saltine cracker and a soft tortilla.
As I mentioned earlier, you can use any favorite taco toppings like: black olives, avocado, onion (white, yellow, red or green onion,) sour cream, pico de gallo salsa (recipe here,) hot sauce, etc.
And my Frybread recipe is easy to just double the ingredients to make more. Also, I reuse my oil, so when it cools down and the flour sediment has settled to the bottom, I pour it into a large pickle jar (cleaned and dried of course) for use on another day.
Indian Summer Vacation Series (click on any title below to see the blog post).
What do you get when you combine a Rock Lobster, an earthquake, a taco truck, and the most ravishing scenic shots of Arches National Park? It's just another typical video from this Cheap$kate Traveler's Indian Summer Vacation Series, of course!
If you've been following me, this is my 8th video of the series and the most outrageous one yet. And these events take place on the 3rd and 4th day of our vacation. We started with a 10-hour drive from Los Angeles (see my on-the-road video here) to an overnight stay in Flagstaff, Arizona, and then on to Monument Valley (click here to see that one.)
In a week or so is my final video blog post of ghostly Indian ruins and a breathtaking trek through Canyon de Chelly National Monument. (Click on any red type in this blog post to peruse informative website links.)
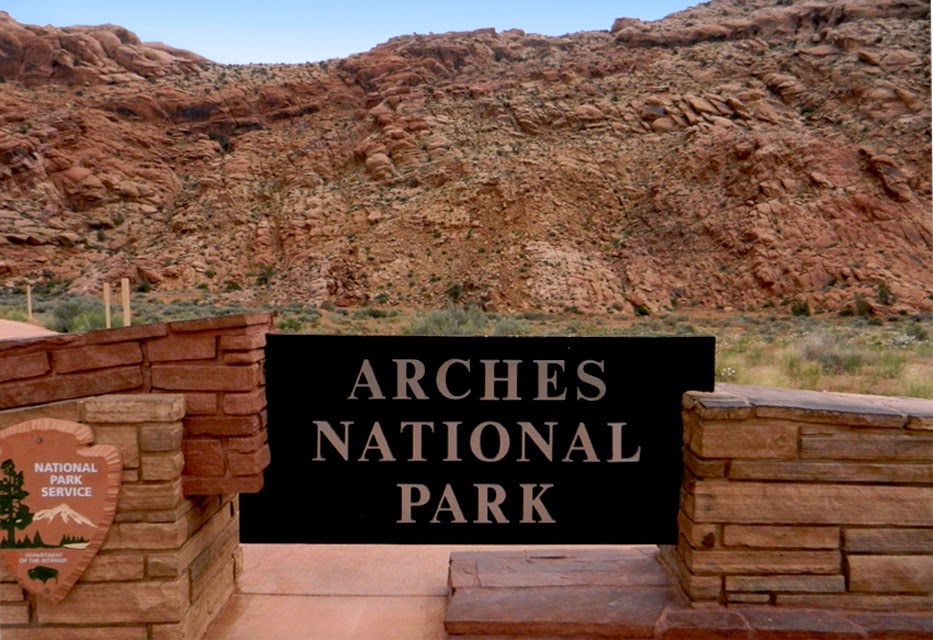
Located just 5 miles from Moab, Utah, and on the Colorado River, Arches National Park is a feast for the eyes. It covers 76,000 acres and contains more than 2000 natural sandstone Arches. The Arches were formed over millennia by rain and wind eroding red-hued sandstone into freestanding magnificent monuments.
Sandstone
Arches come in all shapes and sizes. Some are only a couple stories tall, while for others you would need to be a mountain climber to reach the top.
Broken Arch
There is a Visitors Center at the entrance with camping info, brochures, etc. The park is well laid out, with an 18-mile paved road for easy access. It costs $10 per car and the ticket is good for a week. There are many scenic stops along the road, with parking slots - some rest stops have water fountains and restrooms. We stopped at one that even had picnic tables.
Make sure to get a map and do a little research, as there are many Arches to see. For some Arches, you can just pull over and gawk and take photos. While others, you will walk well laid out and traveled trails. All the rest stops have a clearly made trail map plaque and info about the Arches along the paths.
My wife and I spent 2 days there and barely scratched the surface. We camped in nearby Moab, Utah (click here to see my Camping Video.) The early morning and late afternoon are comfortable times to hike and sightsee. The sun can be brutal, so bring sunscreen and a hat. Even in May, the midday temperature was in the 90's. I wore sandals but would cover my feet better next time, as I stubbed my toe and almost ruined a day.
Not my sandals
Also, bring something to snack on and have a couple of water bottles for refilling along the way. A lot the the Arches can be seen from the main road and are a short hike away. One of the most famous is the 65-foot-tall Delicate Arch. You can take a short hike to see it from a distance - which we did. But to see it up close you must walk 3 miles from the rest stop, which takes 2 to 3 hours to get there. Next time I would take the time to hike it. I could easily spend a couple weeks hiking and taking photos/videos in Arches National Park. And maybe even try to camp in the park itself, although the sites fill up way in advance - click here to read about that.
But there are plenty of Arches with easy access. A most memorable one was Landscape Arch. The hike to get there was about a mile from the rest stop. The trail was easy to walk, with many scenic rock formations and native plants along the way. It's a well-traveled trail and our fellow hikers were considerate and pleasant enough.
Landscape Arch is said to be the world's longest at about 291 feet across. It looks like a man-made bridge. The Arch is a few hundred feet off the trail so you can't stand under it, but you get close enough to be awed by its unique structure and beauty. Of course, I had to do a wacky video scene there involving a fictitious Taco Truck.
The most bang for the buck is North and SouthWindow and Turret Arches. You get 3 magnificent Arch views that are a short walk from the road. There are stone steps that lead the way. And you can walk right up to, and inside, each Arch. Truly awe-inspiring. (Click here to see a cool 360-degree interactive panorama shot of all 3 Arches.
A fun short trek is to Sand Dune Arch. It was like walking on an ochre-hued sandy beach, with giant red walls of sandstone framing the trail. You'll want to take your shoes off when you arrive at the Aches, the sand is so soft and fine to the touch.
Sand Dune Arch
There are many other rock formations to check out. I especially liked Balanced Rock. Again, it's right off the main drag. The boulder on top is the size of 3 school buses. You get a little queasy and nervous just standing nearby.
Balanced Rock
Go ahead and walk right up and touch it. Well, I did - with disastrous results! Be sure to watch my video all the way to the end to see what I mean.
I'm on the homestretch of this Indian Summer Vacation Series. Only a couple more blog posts to go, then it's back to recipes and food reviews. Thanks for hanging out with me so far, and check out my video below -- it's classic 99 Cent Chef in action. Special 99 thanks to the caretakers of Arches National Park and my wife, Amy, for arranging the tour and recording The Chef's outrageous antics.
Arches National Park - Video #8
Play it here, video runs 5 minutes, 38 seconds.
My YouTube video link for viewing or embedding, just click here.